Sunday, October 31, 2010

Bollywood Inspired: Rubies & Golds

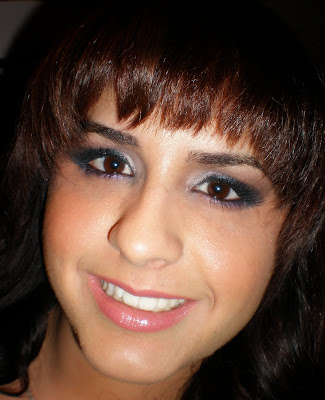
Here is Eleni's first Tutorial. Enjoy!

This wearable Bollywood look is inspired by the beautiful women in India. The women in India are known for their flawless faces, breathtaking eyes, and beautiful embellished sari dresses and jewelry.
See more on this post by clicking "Read More" below!


Click on the images to view them larger

Instructions:
1.       To create this look at home I began by priming my eyes with Urban Decay eye potion, to ensure a long lasting look!
2.       For my base color, I used Half Baked from UD a shimmery gold eye shadow. I patted this color down using a flat brush throughout my eye.
3.       I continued with the crease of my eye, I used a smudge brush to apply glittery brown eye shadow called Twice Baked from UD. Remember blending is important!!
4.       For the inner corner of my eye, I used my favorite eye shadow called Sell Out from the fabulous Urban Decay Vol 2 palette.
5.       As for my brow bone, I used UD Midnight Cowboy Rides Again, please be aware that you will need to clean your face before applying your foundation because these shadows have a lot of glitter!!
6.       I used my Coastal Scent Metal Mania palette to apply a few different gold tones on my eye lid. (Just to give it more dimension)
7.       For my lower lash line, I applied with an angle brush a light gold eye shadow from my CS palette. This brightens up the eye and helps those who have droopy eyes too.   I lined my upper lash line with a soft black liner and applied Make-Up Forever Smokey Eye mascara.
8.       Moving on to face, I primed my face with Make-up Forever HD primer and used Eve Pearls duo foundation.
9.   For cheeks I used Nars Orgasm and Benefit duo bronzer
10.   For lips I used Nars Cruela DeVil lip stick

*By Eleni*

Saturday, October 30, 2010

Featured Look- Mansion Nightclub Event

Makeup done by Eleni
Mansion Nightclub 
See more on this post by clicking "Read More" below!


Although Jaday and I love working together, a lot of times we have to split up to do certain events due to scheduling. In this instance, Lady reached out to us to get all done up for an event her husband was promoting at Mansion Nightclub in the fabulous Miami Beach. Her husband is responsible for the entertainment at the club and was bringing P Diddy as the performer.

Lady wanted a sexy, but not too dramatic look that would stand out at the nightclub. After running my ideas by her, we both agreed on a sultry smokey eye. I decided to take some pictures (please excuse the low quality pictures) and show all of you since I know there are lots of parties going on around this time of the year. Scroll down for tips and for a list of the products I like to use that are great for low light settings so that you too can look great at your next night out.


The pictures don't show all the details, like the glitter and the shimmer :( Unfortunately there was no time to take better ones. 


Products Used:

Eyes
Urban Decay Eye Primer
Coastal Scent 88 Warm Palette
Urban Decay Volume 2 Palette
Urban Decay Naked Palette
Eve Pearl Lashes
Benefit Bad Gal Mascara (good mascara to blend natural lashes with false lashes)
Wet n Wild Sliver loose glitter

Cheeks
Victoria Secret Bronzer
Coastal Scent Blush/Contour Palette
Urbanglow cream highlighter "Sin"

Face/Lips
Make Up For Ever HD Primer
Eve Pearl foundation
Make Up For Ever HD powder 
Make Up For Ever Mist & Fix spray
Eve Pearl lip stick 'Natural'

Body
Victoria's Secret Oh La La Body Shimmer

MUST HAVES for nightclub makeup
Because the lighting in most nightclubs is dark, the best way to look great and be the center of attention is by capturing the light with glitter and shimmer!  Here are a few products that do exactly that:

Urbanglow Cream Highlighters
Apply a shimmery highlighter above your cheek bones and cupid bow

Victoria's Secret Oh La La Body Scented Shimmer
Apply body glitter wherever you're baring skin

Make Up For Ever loose Glitter
Apply loose glitter on your eyelids

Sephora Glitter Lashes

Lashes are a great way to add drama to your look 

Make Up For Ever Mist & Fix Spray
Great way to ensure your makeup stays in place all night long


Thank you Lady for hiring me for your special event. 

*By Eleni*

Review- Kat Von D True Romance Eyeshadow Palette - Ludwig

Time for another review! This time we will take a look at the Kat Von Ludwig Palette. As you must know by now, I am a big fan of Kat's makeup line especially her eyeshadow palettes. This one did not disappoint.

Photo from Sephora.com

This is the official information about the shades, provided by the Sephora website:

The Ludwig palette contains the shades:
- Lucifer (matte charcoal black)
- Orbi (golden green shimmer)
- Dimebag (metallic lime green)
- Clay (beige with gold glitter)
- Tequila (metallic cornsilk shimmer)
- Downtown (metallic light copper shimmer)
- Baroque (golden bronze shimmer)
- Leather (deep chocolate brown sheen)
- Two double-ended applicator brushes

I tested this palette on a look that is coming up soon and the shadows looked gorgeous. They are creamy, satiny and glide on very easily. What I liked the most about the product was that you can really control the intensity of the shades since they go on very lightly at first, but if you apply a little more, then you get a more dramatic color.

My favorite colors on the Palette were the Greens and the Chocolate color. They are the perfect colors for fall and winter. This is a great palette to carry in your makeup bag, because you can create a natural look, or a dramatic smoky eye with it. Overall I recommend it if you are looking for day to day makeup and especially earth tones.

Stay tuned for a new makeup look featuring this palette and also for  a review of the Tarte "Jewerly Box" palette.


Note:
I know things have been a little slow around here this past 2 weeks, but I am due any day now with baby Amelie and since I have been on Bed-rest that really limits my work (for now.) However, I still have some makeup magic "cooking" so keep checking back for more looks, tutorials, and reviews.


Jaday :)

Friday, October 29, 2010

Inspiration: Vanda Sanderiana Orchid


For this look, I got my inspiration from this picture of the Vanda Sanderiana Orchid. This is such a beautiful and exotic flower. I love the colors because it is difficult to tell what they are exactly. Is it purple? Is it maroon? Is it pink? I don't really know, but what I do know is that this captivating flower inspired me to create this look:
See more on this post by clicking "Read More" below!


Full Face:


I used many different colors to achieve this look. I wanted it to be similar to the orchid's colors so I used mauve, pink, purple, plum, maroon and even black. The false lashes added the extra drama the look required. I hope you liked it :)

Sunday, October 24, 2010

WHAT TYPE OF EYES DO YOU HAVE?

OK, I admit my favorite feature on a person is their eyes. Big eyes, little eyes, dark colored eyes. light colored eyes, cat shaped eyes and rounded eyes. I love them all!

Let's jump right into the different types of eyes there are in reference to makeup and makeup application:


Small Eyes: Eyes like these can be tricky when it comes to eyeshadows and eyeliners. Placement is what will be important. NEVER use dark colored pencil eyeliner, gel eyeliner or powdered eyeliner along the upper lash line(where the upper eyelashes are) or lower lash line(where the bottom eyelashes are). Doing so would close the eyes more making them appear smaller. If your an eyeliner lover another trick you can do is place the eyeliner along the outermost corner of the eye(aka outer V) and wing it up or back. Similar to creating a cat eye. This will make the eye seem a little bigger.

Close set Eyes: Eyes like these are accentuated best when a lighter color is placed in the innermost corner of the eye(near tear duct and nose) with a darker color in the outer V. This gives the closeness of the eyes the illusion that there's more space between them. Darker colors in the innermost corner will just make your eyes seem even closer. The key here is to always brighten your eyes up, mystery is good but lets keep the darkness away from your face.

Bulging Eyes: Eyes like these can appear even bigger with light or pastel shadows on the eyelid. The key is tho definitely embrace your dark colored eyeshadows and eyeliners. The dark colors will under-emphasize the bulging of the eyes and EMPHASIZE the eye itself..

Deep set Eyes: Eyes like these give off that mysterious look. That can be difficult when it comes to choosing which eyeshadows are best. It doesn't have to be. The rule of thumb with eyes like these is to use LIGHT colors on the eyelids! Using darker colors on the eyelids will shadow the area around the eye even more.

Wide set Eyes: Eyes like these fare well with dark colored shadows and eyeliners, especially in the innermost corner. Placing it here will bring the eyes "closer" together.

Droopy Eyes: Eyes like these can work best when a winged liner look is used. When applying any eyeliner make sure its winged (drawn upwards) at the outer V. This will make the eyes seem "lifted".

Let's also discuss the different types of EYELIDS:

Mature eyelids: These lids may be wrinkled, or have some saggy skin, or even crows feet on the edges and may even be very dry making eyeshadow application difficult. The key here is to hydrate the eye using a light moisterizer or even an eye cream. Using products with Retin-A (anti-aging agent) or firming complexes is best. Matte eyeshadow colors are best they will adhere to the eye better and an eyeshadow primer should definitely be used. Steer clear of creamy eyeshadows as the uneven surface of the eyelid will make that form of shadow crease


The above diagram was provided by Google. There are many many many eye shapes. I will definitely have another post discussing more shapes and flattering eyeshadow/eyeliner applications. We will also move into eyebrow shapes, lip shapes and the shapes of faces in general and how each can affect your makeup placement. stay tuned for that. Leave and questions or comments below, rate and follow me if you like. THANKS!

Wednesday, October 20, 2010

CHERRY BLOSSOMS


So my inspiration for the name Sherry Blossom Beauty is derived from my real name and my love of the cherry blossom flower! In high school, I took up Japanese for my foreign language class and I enjoyed it. It was lots of fun and the language is so unique. I didn't become fluent and I've forgotten much of what I learned except for the Cherry Blossoms.

Cherry Blossoms is the given name of the flower from the cherry tree.
In Japanese this tree is known as Sakura. Cherry Blossoms are indigenous to Japan, Korea and China.
There is a practice known as Hanami which is the celebration & viewing of beautifully bloomed cherry blossoms.
Cherry blossoms are omens of great fortune, affection, and love.

Sunday, October 17, 2010

SHERRY BLOSSOM BEAUTY


So I've finally arrived! Blog World! LOL

A little background on me. My name is Sherry. I'm a budding freelance makeup artist and makeup/beauty blogger. I've always been a writer more specifically a poet. I never thought this is what I would wind up doing for the world to see but here I am! I've never been happier.

First I'm not a makeup expert, guru, fashionista or the greatest there ever was. I'm a regular person that just loves makeup and being a makeup artist. I am an "everyday woman". That's what I'm shaping this blog around and that's what type of service I'm providing as a makeup artist. Let me explain, an "everyday woman" is all of you. Working women, homemakers, mothers, married women, single women, young women, old women, urban/city women, suburban women, college student women, women who drive, women who take the bus/train, local women, all shapes, colors and sized women. I'm here for you because I am just like you. There isnt anything so extraordinary about me. I'm not super rich, famous or even super popular. That's what I love! I can relate to all of you as blog followers, bloggers yourselfs or even clients!

I remember when I first grew a love for makeup and how it felt so overwhelming. I would google and youtube different things and would be bamboozled by products, brand names, websites, articles, photos, reviews, blogs, videos, comments and stories from different places and people. I would feel disconnected like maybe I was in way over my head. I couldn't even afford most of the things I liked and forget being able to afford a makeup artist to do my makeup for me! It was then that I wished there was someone out there like me, someone who understood that everyday women want to look and feel beautiful as well. That's when I decided I would become that woman! The above quotes summarizes it all, I can make you up flawlessly and beautifully ,but if you don't feel it within nothing else will matter. I'm here to help you not only feel great and beautiful on the inside but the outside. I genuinely care about each and every supporter, fan or client. You all help make me who I am and I thank you!

So guess what this is all for you! We are going to have fun! Ask me any questions and I'll answer, if I don't have an answer I will find it for you and post it expeditiously. Email me or leave a comment and I'll write back. Offer suggestions or even insight on anything dealing with beauty or even women as a whole. We learn something new everyday and I want to learn from all of you. I can't wait! Let's get started!

Friday, October 8, 2010

Tutorial- How to fill in your brows

Hello Makeup Friends,
This tutorial was specifically requested by blog reader Patty. She wants to know how to fill in her brows and make them look fuller, but natural.
If you do research on the internet, you will notice that each makeup artist has their own technique for this and if you have already learned a way that works for you, then by all means don't change it on my account.
This is just the way that I have learned to do it and after many years and many different faces, I find that this gives the most natural results. WARNING this is a very detailed and long post with lots of information, so grab a cup of coffee or tea and enjoy.

Products Used:
Inglot customized brow palette, a brow/liner brush, and a spooly brush.
See more on this post by clicking "Read More" below!

The key to great brows is having the rights product. I prefer to use powders to fill in the eyebrows, I have found that used correctly, they provide the most natural results. Powders also give you the flexibility of mixing the colors to find the correct shade. 

Although Brow pencils are very popular,  I don't recommend using them to fill in your brows, because they tend to make the brows look too harsh and even if done correctly it tends to be very artificial looking and noticeable. 

No matter the condition of the client's eyebrows, I have never had to resort to using a pencil. Look through my Before and Afters page and you will see examples of eyebrow transformations all done with powder.

My favorite Brow Product is from Inglot, but unfortunately, Inglot is a pro brand that is not available in Florida. Now, since most of my readers are not Pro Makeup Artist, I don't think you will need a product of that caliber. Don't you worry, I have included here some more affordable products to achieve great results at home. I never recommend anything I have not tried, so rest assured that all of these have my seal of approval.


(Click on the names to go to each site)
The NYX Eyebrow Cake Powder is only $6.

The Coastal Scents Brow Tones Palette only $9.95
For those of you willing to spend more money, the Benefit Brow Zings are a great investment and I highly recommend them:
Benefit Brow Zings $30

Now that you have the tools, lets get this started. 
Click on Read More to read tips and step by step instructions.


Color selection:
You always want to use a powder color that is lighter than your brow hair color. 
  • Even if you have black hair, you NEVER want to use black on your brows. 
  • If you have blonde hair, use a light ash brown with a green undertone. Please no yellows! Natural redheads usually fall under the Blonde category when it comes to brows, they just need to use a color with a hint of orange. I said a HINT, don't go buy an orange eyeshadow and put it on your brows :)
  •  Brunettes have it easy, there are lots of browns available and as long as you follow my go lighter rule you will easily find your color.
  • Artificial redheads are a little bit trickier, the truth is that no one has naturally bright red eyebrows, so if you color your hair red, then stick to warm browns for your brows with maybe a slight red undertone.
  • TIP: You can use any matte eyeshadow as a brow filler.
Application:
Always begin with groomed  and brushed brows. Pluck away any stray hairs.

  • Now dip the brow brush on the brow powder color that most resembles your natural brow color making sure you follow the guidelines I wrote above. 
  • Remember you can use more than two colors. 
  • TIP: Always dip the brush on the lighter color first and then on the darker one. Why? Because the last color you dipped into will be the first color to go on the actual brow. In this case you want the lighter color to go on top of the darker to blend it well, so when dipping you do the opposite. Get it?
  • Now start applying the color on the center of the brow using short horizontal strokes following the direction of the hair growth. Do this softly and kind of like if you were drawing little hairs. 
  • Continue filling in the rest of the brow following this technique, and don't be afraid to go slightly outside the line in order to shape and arch the brow.
The brow to the right has been started and you can begin to see the difference. 
  • When you reach the tail part of your brow, use only the very thin tip of the brush and softly apply the color.
  • Now grab the spooly brush and brush your eye brow using short strokes following the hair growth. This will blend in the brow powder with the hairs and give you a more natural look.

All done!

  • TIP: If you want your brows to stay in place for a long time, spray the spooly brush with Hair Spray and brush it onto your eyebrows. Trust me, this works better than any brow gel.
For those of you that want a more dramatic look, you can fill in the brows and keep going outside the area where the hairs grow creating any shape you desire, but you might want to reserve this for only special occasions and night time. The key is to blend it all together with the spooly brush and use the application technique I described. 

Here is an example of the same eyebrows, over filled to create a thick, dramatic brow.
Big difference. Super dramatic.
I hope you learned a lot from this tutorial and remember that practice makes perfect so Practice, Practice, Practice until you get it right.

Jaday :)

Monday, October 4, 2010

Tutorial- Daytime look for Fall using UD Book of Shadows Vol III

As promised, here is a super easy and fun daytime look that you can wear with confidence. It was a spur of the moment look inspired by the nice sunny day with clear blue skies.

 Scroll down for full instructions.
This picture was taken in natural sunlight, no flash, to show you how it truly looked in person.
See more on this post by clicking "Read More" below!


Again, no flash.
Now here are the pictures taken inside with flash so that you can see the details:


I used the Book of Shadows Vol. III, but you can substitute with your own eyeshadows.


Here are the Instructions in less than 10 steps:


1. Apply the UD Primer Potion all over your eyelid. This will ensure that your eyeshadow will stay put throughout the whole day.
2. Apply the color MAUI WOWIE ( a gold with a hint of green) all over  your lid stopping under the crease.
3. Now with a Crease brush, apply a mix of the colors HAIGHT (a dark teal) and RADIUM (a bright blue) just on the outside V of the crease making sure to softly blend it into the rest of the crease.
4. Now apply the color SMOG ( or a coppery brown) on the rest of the crease above the blue color. As always, make sure you blend it all really well.
5. I used the Urban Decay liner in the color Bourbon to softly line the upper lid and the outer half under my waterline (lash line,) but you could just use the same brown eyeshadow that you used on your crease or any Coppery Brown eyeliner you may have.
6. I then used a mixture of the two blue colors to line the inner half under my lash line.
7. Apply mascara and a natural pink lip gloss and you are good to go out and enjoy a Sunny Day!


Don't be intimidated by the long instructions. I promise the whole things takes maximum 5 minutes to do. It took me longer to write the instructions than it did to actually apply my makeup.


I hope you have fun creating your own version of this look and I really want you to try it, because it is simple to do, but the results are fresh and fun!


JADAY

Review- Urban Decay Book of Shadows Vol III

It's no secret that Urban Decay is one of my favorite makeup brands for personal use. I especially love when they come out with their Book of Shadows  because I find that they are such a bargain. I started purchasing them back when the first one came out and I fell in love.

Here are some pictures of the new one:

Clearly they went with a NYC theme.

Check out the adorable NYC pop up with little lights.

See more on this post by clicking "Read More" below!


And here are the eyeshadows.


The kit comes with 16 eyeshadows, 2 eyeliners (Zero- black and Random-purple) and with the original Primer Potion all for the price of $54 which saves you lots of money since typically each individual UD eyeshadow is $17, so you do the math.

Now for my Review:
I have to say this is certainly a must have! You can create so many looks with this. From Natural, to Smokey, to Colorful. 

The eyeshadows themselves are super pigmented and creamy and a little definitely goes a long way. Instead of listing my favorite colors I'm going to just say that my least Favorite is Midnight Cowboy Rides Again. That color is so glittery and has so much fallout that I honestly hate it, but they manage to include it in all their Palettes. Oh well! Other than that, the rest of the colors are winners in my book.

The eyeliners from Urban Decay are my favorite to use on the lid since they have a lot of staying power. Random is one of my favorite Eye Liner colors and I use it all the time, so I was glad to see that they included one in this Palette. 


So here is where you can get your own:

Remember this is a limited edition product, so I would hurry up and get it before it runs out.

Stay tuned for some easy makeup looks I have created using this Palette to show you how versatile it is. 


Coming Up

Hello Makeup Friends,


I just wanted to let you know that I have been busy working the makeup magic, but I still found time to create some fun looks coming up for you this week.

Here is a little preview of what's "cooking:"

*A full in depth review of a very popular makeup palette that just came out. ( I will give you a hint, this it the third volume.)

*A fun and easy day-time fall look with instructions for you to try it at home.

*A dramatic night-time fall look for all you daring divas out there!

* As requested by a reader- A detailed tutorial on how to properly fill in your brows to make them look fuller in a natural way.

As always, this blog is for all of you to learn more about makeup and I love to share all of my tips, ideas, and knowledge with you. As long as you are being creative and having fun with your makeup, I'm happy to help. :) Nothing brings me more pleasure than helping you get inspired to try new things and teaching you how to bring out your natural beauty with your makeup.
Don't forget that you can always email me with any suggestions for new tutorials that you might want to see on the blog. Also, if you tried one of the looks I have posted, feel free to email it to me and I will gladly post it on the blog, don't be shy :)

Stay tuned,

Jaday