Showing posts with label False Lashes. Show all posts

Tuesday, November 1, 2011

Tutorial: Fall 2011 Look- Inspired by Beyonce

Hello my dear makeup friends!
Oh how I have missed this blog! I know it has been a while since I have posted, but I am back. I have been super busy in both my professional life and my personal life. Between motherhood, purchasing and remodeling a new house, going back into the workforce, and a million other things, I have abandoned my blog. Eleni has been holding down the fort while I was gone, and she has done a fabulous job. I know you all enjoyed her super cute looks. Okay, enough with the blabber, I know you will forgive me. I finally took pictures of a look and I can't wait to share it with you. 


I, along with probably all makeup bloggers out there, fell in love with the makeup looks in Beyonce's new video "Countdown." Here is my own version of one of the looks in the video. I used colors that compliment my complexion, so don't expect an exact copy, this is just inspired by it.


Here is the look I'm talking about:
It's retro, fresh, and cute! What's not to love?

Click on for a Tutorial and Pictures!


Now here is my interpretation:
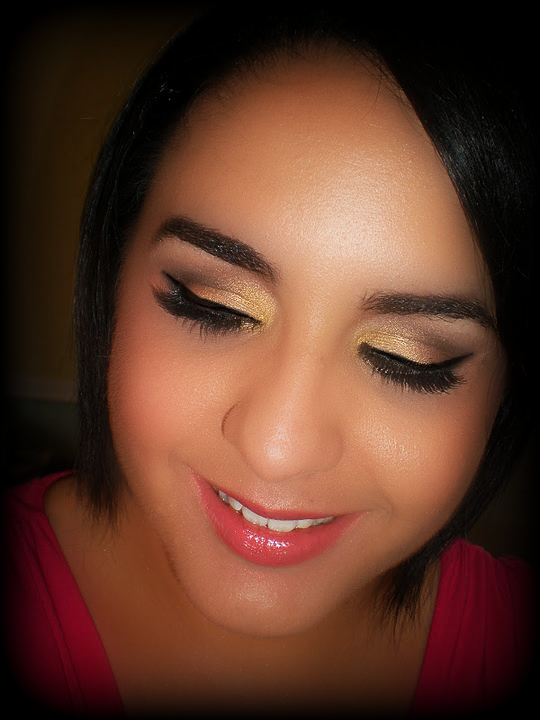
I used more gold and bronze colors instead of the yellow. I try to stay away from yellow when it comes to my makeup, It really does not look too good with my complexion.
-Tutorial!
For the eyes:
  1. Apply a Gold or Yellow eyeshadow to the inner half of your lid. Make sure to apply to the inner corners of the eye.
  2. Use a crease brush to apply a brown shadow to you crease, blending it really well.
  3. Now apply a dark bronze shadow to the outer corner of the crease, blending the color into the gold.
  4. Line your upper lid with a black liquid liner and wing it out at the end.
  5. Use a black pencil to softly line under the waterline and blend it in with a brush so that there are no harsh edges.
  6. Apply your favorite mascara, or you can apply false lashes like I did to give a little more drama to your eyes.
For the face I used my Temptu AirPod foundation, bronzer, blush and highlighter. You can just use your favorite dewy foundation and a cream blush to get that "pregnancy glow" like Beyonce's.

I hope you have fun creating your own version of this look!

***Jaday***


Tuesday, May 17, 2011

Nicki Minaj inspired Makeover

This week I bring you this fun and modern take on a Pinup look.

Here is the inspiration picture:

See more on this post by clicking "Read More" below!

 
Our version of the look:

Before the Magic of Makeup:

To create the hot pink lips I lined the entire lip using MAKE UP FOR EVER Aqua Lipliner in Fuschia 16C. I love the Aqua Lip liners, a staple in my makeup Kit, they will last all day and night! After lining the lips, I applied Inglot Lipstick #69 (a hot pink from the Freedom Palette.) I applied a sparkly lipgloss to the center of the lip and Voila!

To view more pictures of this look and lots more Glam looks, click here.


Thank you Tahiris :)

***by JADAY***

Monday, April 4, 2011

Jessica Rabbit Inspired

"I'm not bad. I'm just drawn that way"-Jessica Rabbit


See more on this post by clicking "Read More" below!

Here is the list of products I used to create this sexy look!

Face:
Eve Pearl Foundation
Coastal Scents Blush/Contour Palette
Motives Blush/Bronzer Duo
Urban Decay Urban Glow in 'Sin'

Eyes:
Urban Decay Naked Palette
Coastal Scents Warm 88 Palette
Kat Von Dee True Love Palette
NYX False Lashes
NYX Glitter Pen in Silver
MUFE White liner
MUFE Cake Liner in Aqua Black

Lips:
Nars 'Cruella'
NYX 'Red Gloss' Palette

Once you look the part... You need to feel the part! Jessica Rabbit is beautiful, glamorous, and passionate. So "why don't you do right?" and strut your stuff!

**By Eleni**

Tuesday, February 8, 2011

Classic Pinup/ Old Hollywood

This post is a treat for those of you that have emailed and posted comments requesting another Pinup look. I adore the 1950s era, not only for the movies, but for the clothing, makeup and overall style of the time period. This look is my go to look for pretty much any type of fancy or formal event.

The Pinup look is actually one of the fastest looks to achieve and I will show you how to do it in this tutorial.

See more on this post by clicking "Read More" below!


Instructions:
For the Eyes:

  • Apply a shimmery champagne eyeshadow in the inner corners of the eye slightly extending it to the lid.
  • Apply a matte light nude eyeshadow to the rest of the lid.
  • Now take a small crease brush and use it to place a dark brown almost black shadow on the outer V of the crease.
  • Using the same brush, blend the dark color to the rest of the crease and upward towards the brow bone.
  • Use a black liquid liner to create a dramatic winged out line on the upper lid. Like this:

  • Start out with a thin line, and once you have the exact line you want,  make it thicker.
  • Apply your favorite mascara.
  • Optional- apply False lashes if you want the look to be more dramatic
For the Lips:
  • Make sure your lips are moisturized by applying chap-stick or Vaseline. 
  • Fully line your lips with a lip pencil, and then apply your favorite red lipstick.
  • Now apply a tiny amount of shimmery white eyeshadow to the center of the lips using your finger. This will make your lips look fuller.
Tips:
For a true 50s look, keep the liquid liner on the top, never on the lower lash line.
If you don't want to apply false lashes, then make sure to apply a lot of mascara to the top lashes and barely any to the bottom lashes. This will create a similar effect. 
Keep the foundation Matte and flawless.
Don't over do it with the blush.
Never apply lip liner outside the natural lip line in order to make the lips look bigger. This hardly ever looks natural. 
You need to take your hair color into consideration when choosing your red. Remember that your favorite red lipstick may not look as great on you if you have changed your haircolor. 

Tuesday, November 30, 2010

Egyptian Inspired Makeup Look

Egyptian Royalty Inspired Makeup

Time for another Photo shoot where I let my creativity and imagination take control and come up with a more dramatic style makeup look. This time we "travel" to Egypt.

Here we have my assistant Eleni. I wanted to make her look completely different and I was inspired by Egyptian style makeup to create this amazing transformation. I took the pictures without flash, using low yellow lights to create a warm, mystical effect. Scroll down for more information, tips and ideas that you can use to recreate this look.
See more on this post by clicking "Read More" below!


Here is the Before:

And after the transformation:


Closeups:


Slideshow with lots more pictures:


Tips and tricks:

As you can clearly see Eleni is naturally pale so I darkened her skin tone about 4 shades for this look. Egyptians were known to be tanned and I wanted to make her look tanner and also give her that golden glow to her skin.

Tips on fake tanning with foundation:
  • In this case I used a foundation palette that had shades ranging from 3 to about 6 shades darker than her skin tone. I used the different colors to contour and highlight the face so that the tan looked more realistic.
  • If you want to try this at home I would recommend you make sure to buy a darker cream foundation that is not too orange. Make sure you blend it well into the hairline and apply it to your ears, neck and décolletage.
Tips on body Makeup:
  • To tan her body I blended an inexpensive dark Liquid Bronzer with lotion and applied it all over her arms and her back. This gives the skin that coveted golden glow.
  •  (You can also use this tip to make your legs look tanned and amazing.)
  • I also used Benefit's Bathina to add shimmer to certain areas I wanted to highlight.
Tips on applying glitter as eyeshadow:
  • To achieve the super glitter look on the eyelids apply a gold cream eyeshadow (I used the gold shade in the Make Up Forever 12 Flash Color palette of creams) all over your lid. Then apply a darker cream eyeshadow on the crease, creating a v shape at the end. Then apply your favorite gold glitter on top of the gold base (I used the Make Up Forever Diamond Powder in Gold) and a darker coppery one on the crease (I used the Make Up Forever Diamond Powder in Smoky.)
  • Applying a cream eyeshadow under the glitter helps it adhere to your skin and it will make it last longer.
This is the makeup I used to create this look:
A lot of makeup for one look right?

I hope you enjoyed looking at all the pictures and I urge you to try this look at home. You can easily make this more wearable by using eyeshadow instead of glitter and applying a natural lipstick.

Jaday


Saturday, November 27, 2010

Featured Bride- Neith G.

This gorgeous bride did not need much to look  beautiful on her wedding day. I made her alluring eyes the focal point by using soft golds and browns and a very subtle winged liner. I applied false lashes with a technique that blends them with the natural lashes so that they are not obvious. Shimmery white eyeliner on her waterline was the final touch to make her eyes pop even more.

 
See more on this post by clicking "Read More" below!

Before

After

Close up


Here you can see an example of makeup application to the chest area. I used body foundation,  highlighter and a darker powder to enhance the cleavage. On brides, I always apply makeup to the chest, ears and the back (as needed.) This is not necessary on a daily basis, but on a bride it is imperative that she looks flawless from all angles and as a makeup artist, it is my job to notice the little details.


Thank you Neith for choosing me as your makeup artist on your special day. Best wishes on your new life.

Thursday, November 11, 2010

Pinup Makeup Shoot

These pictures are from a super fun look! The classic American Pin Up girl. This look can be worn to any special event by wearing less extravagant false lashes and toning down the eyebrows. Enjoy.:)


See more on this post by clicking "Read More" below!

 This is a picture of a traditional pin up from the 40s and 50s, just to give you and idea:


Before:

After


Posted by Picasa


Posted by Picasa